
Scenario
Your job has given you a "work laptop" that you also use (legitimately, of course) for your own occasional personal computing, so you've amassed some personal files over the course of your employment. Now suppose that computer got taken away from you before you had a chance to get those files off? Perhaps one day you walk into your office and find a brand new laptop waiting for you. Cool! Except - where is your old one? "Don't worry!" says Helpful I.T. Guy, "All your work files are on the network, just log in to this new one and you'll have them." Yes, but were your personal files deleted? And if not, does the person who now has your old computer have access to those files?That's not an unlikely scenario - and worse ones can be imagined. What if one day your HR rep walks in with a security guard to announce that you've been downsized - "Stop what you're doing on that computer, gather your personal belongings, and come with us." Now what?
In this article I will explain my setup for avoiding issues like this. In reality the entire setup is fairly straightforward and not very time consuming, it actually took me several times longer to write the article than to do the setup! So don't be afraid to jump in.
What Won't Work
Whether we are talking about a personal computer or a loaned work computer, trusting your Windows login is a bad idea. This is because when you log in to your computer, you are given access to a User Profile that keeps all your personal stuff organized. But the User Profile is really just a folder on the hard drive accessible to anyone with admin privileges on your computer. Worse, even someone who is not an admin can break the Windows Admin login in about 5 minutes even if they're new to it - and of course it will take no time at all for your I.T. department.
You need something that makes the files inaccessible to anyone but you regardless of access level. My personal solution is to install DropBox into a portion of a drive (the computer's hard drive, or any external drive) that has been encrypted with DiskCryptor. This combo makes for a powerful and simple file security experience.
Dropbox + Diskcryptor = Convenient Personal Security

Even those unfamiliar with computer security have probably heard of "encryption." Basically, encryption is a method of encoding files and securing them with a password. Many operating systems come with built-in encryption apps (e.g., Window's BitLocker, or Apple's FileVault), but you may not have access to these, and some native encryption apps may not be able to encrypt a portion of your computer's hard drive (which is what you want in order to work with DropBox).
DropBox is a cloud-based backup app that syncs your files to its cloud server in near-real time so that even if your computer crashes (or is taken by that mean HR rep!), everything in the DropBox folder on your computer is also saved in secure online storage (which you can access from any networked computer, even if DropBox is not installed). You also can install DropBox on multiple computers which keeps your files backed up on multiple computers too. It's super handy for things you work on a lot, because you do not lose your changes even when switching between computers.
DiskCryptor is an open-source encryption suite that supports full or partial disk encryption. Both are handy. If you want to secure an entire drive (like an external hard drive, or a USB flash drive), you can do that. Or you can create a logical drive (a disk "partition") and only encrypt that one portion. Once a drive is secured, it will require a password to get it to work (the computer will recognize the drive's presence, but will not be able to access it unless DiskCryptor mounts it.).
Put these two apps together, and you get a real-time, cloud-backed, encrypted file space on your computer. You drop your "Personal Stuff" folder into it, and not only will DropBox keep your files synced in case something happens to the computer, but no one but you will be able to access it.
Setup
I won't go into a detailed DropBox setup here - it's very easy. Just go to the DropBox website, set up an account, then download and run the install file. If you already use DropBox, all you'll need to do is move it into the secure space once it is created, which I will explain below.The DiskCryptor setup can be a tad unnerving for those new to messing with their computer's disk setup, but trust me - this is standard stuff, no big deal. Just follow the steps and you'll be OK. Worst case, you lose all your data and have to buy a new computer (Just kidding! But, you know, you should always back up your stuff - period. And it's a good idea to do it one more time before you do anything you're new to on a computer.)
OK, here we go.
1. Download the DiskCryptor installer and run it (just follow the setup wizard).

Once it runs, you will get a popup list of the available drives on your computer. (Note my "X:" drive - that's my secure drive which I will be pretending to create and secure in this tutorial.)

These are the drives available for encryption. If you have any logical or external drives connected, these should show up as well (likely labelled E:, F:, G:, etc.). The encryption process formats the drive (wipes it clean) so back up your files first! For the purposes of this article, we will be encrypting an internal drive on the computer itself - more precisely, a portion of your C: drive.
The C: drive is likely your main drive - the one Windows runs off of, and that contains your User Profile and thus all your stuff. You DO NOT want to encrypt your entire C: drive! Encryption would wipe out everything on the drive, including your operating system - and even though it is possible to make it work, you can easily mess things up. So we're just going to make a new drive out of part of the C: drive (this process will work for any drive though).
2. Click your START button, right click "Computer" and then choose "Manage."

3. Once the Computer Management window opens, select Disk Management. This will show you graphically what disks your computer recognizes. Each physical disk (Disk 0, Disk 1, Disk 2, etc.) gets its own row, and if that drive is partitioned (divided into "logical" drives), these will appear as sections within that row along with their assigned drive letters. In the example below, I have my main hard drive (Disk 0) in three partitions including my C: drive, plus I plugged in two USB external drives (Disk 1 and Disk 2) each of which is divided into two partitions (D: / O: and E: / P:)

4. Right Click inside the partition labelled "Windows (C:)" and choose "Shrink Volume...".
This will allow you to make a new logical drive partition with its own drive letter. This will become your encrypted space.
5. You will be told how much space you can shrink the volume and then be asked how much to actually shrink it. Don't go crazy here - your C: drive needs breathing space to function and it's not like you're going to be storing movies in here, right? Right? In my example, I made it 10gig ("10000" in MB), but do what you gotta do. Enter how much space you want your new drive to be, then Click SHRINK.

6. After drive shrinkage, there will be a new partition next to your C: drive. Right click the new partition and choose "Change Drive Letter and Paths" to label it with a letter of your choosing. (You might want to pick a letter that won't get taken, something toward the end like "X" - which also looks cool).

You now have a shiny new drive! If you open up MY COMPUTER, you'll see it in your list.

7. OK, time to encrypt. Run DiskCryptor and left click on the drive you just created. (the drive will highlight when selected, but it's like two shades lighter than the regular background and hard to see.) Then click the "Encrypt" button. It will ask for a password - make sure to make it a strong password (duh!). Then DiskCryptor will start doing its thing.


It will take some time to encrypt, especially if you made a giant movie storage sized partition. (In the worst setup I ever tried it on - an external drive connected through not one but two USB relays - it took about 2.5 minutes/gig.) When it's done, the "Encrypt __%" notification will change to "Mounted".

Now that the drive is encrypted, it will not work until it is mounted by Diskcryptor. This is how DiskCryptor's security works. To mount an encrypted drive, just run DiskCryptor, left click the drive, click the "Mount" button" and enter your password.

If you want to try the mounting process right now, go to step 8 - if not, you can skip to step 9.
8. To perform a trial drive mount, click your new drive and click the "Unmount" button. This returns the drive to its unusable state. Now open MY COMPUTER and double click that drive. You should get a warning that the drive does not work and needs to be formatted. DO NOT FORMAT IT! This is just your computer's way of saying "I can't do anything with this drive." So Just click CANCEL.

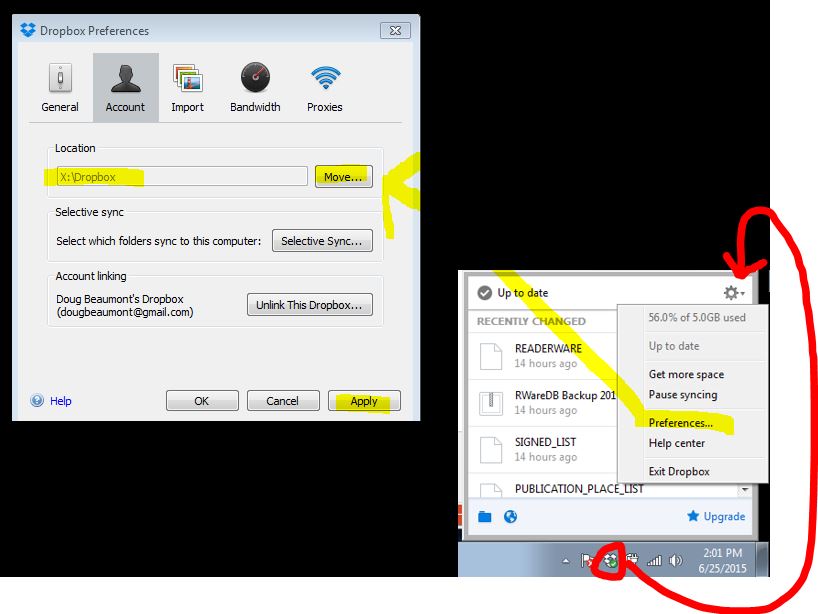
9. The last thing you need to do is move your DropBox folder into this new encrypted drive. Run DropBox and/or click it on the TASKBAR, then click the GEAR, then choose "Preferences...", then "Account". Here is where you will tell DropBox where to put its synced folder. Click "Move..." and put DropBox in your new drive.
Once it's done, so are you! DropBox should now be synced to its folder in your encrypted drive.

Now, whenever you log in, you can mount your drive with DiskCryptor - otherwise, it will remain encrypted. Since DropBox is set to start up when your computer does, you'll need to run DiskCryptor to allow it to access to the encrypted drive. You'll get a startup popup that says DropBox cannot find the folder - no worries, just exit out. Once you mount your drive, it will work fine. If the popup gets annoying, uncheck the auto-startup box in DropBox preferences.

TWO IMPORTANT NOTES: First, once you mount an encrypted drive, it will remain mounted until you unmount it with DiskCryptor or completely shut the computer down. This means that if you just put the computer in sleep, hibernate, or lock mode - or even if you log out - anyone with admin privileges can still access the drive. The drive is not secure unless it is unmounted.
Second, even if your unmounted drive cannot be accessed, it can be formatted. That's another reason why the DropBox (or some other) sync feature is an important part of this plan, and it's another good reason to unmount the drive any time you are not in control of your computer.

No comments:
Post a Comment