Scenario
You have a WinPE boot drive with imagex on it, but you want to add GImageX to your WinPE environment so that you have a GUI front end for your WinPE boot drive. Mostly likely because you are tired of entering the imagex commands manually.If you want to know how to create the WinPE USB drive, please view this article.
What you will need
- A USB drive
- GImageX - https://www.autoitscript.com/site/autoit-tools/gimagex/
- Windows ADK 10 - https://msdn.microsoft.com/en-us/windows/hardware/dn913721.aspx
- DISM GUI - https://dismgui.codeplex.com/
Instructions
We will be using DISM GUI during these instructions. You can just use the Deployment and Imaging Tools Environment, but I don't want to type in all the mount and unmount commands.1. Mount your boot.wim using DISM GUI
As you can see, you just select the WIM that you want to mount, in this case you mount the boot.wim that is in your local .\media\sources\ folder. This was created previously using the copype command. For more information on this, see this article. You just need to mount this boot.wim to a mount directory somewhere on your hard drive so that we can copy GImageX into your .wim.
2. After you have mounted the boot.wim, you need to create a folder called gimagex in your Program Files directory.
IN MOUNTED WIM
I create a gimagex folder in the Program Files (x86) directory and then copy needed files into that directory.
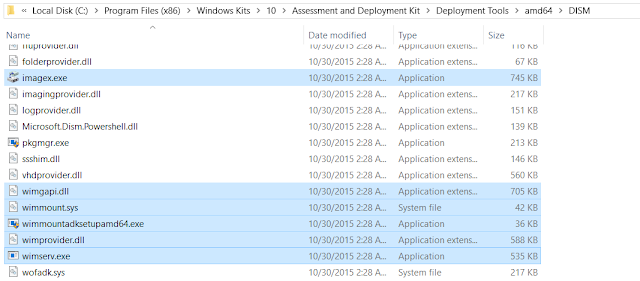
3. Next find the following files on your local computer (the one with Windows ADK 10 installed on it) and copy them into a folder in your mounted .wim.
ON SOURCE COMPUTER
C:\Program Files (x86)\Windows Kits\10\Assessment and Deployment Kit\Deployment Tools\amd64\DISM
4. Copy the above highlighted files into the gimagex folder that you just created. Additionally, copy the right version of GImageX into the folder (x86 or x64). Your mounted gimagex directory should look like this:
Files:
- gimagex.exe
- imagex.exe
- wimgapi.dll
- wimmount.sys
- wimmountadksetupamd64.exe
- wimprovider.dll
- wimserv.exe
5. That's it, now you can unmount / dismount your wim. If you still have DISM GUI up, you should be able to click Dismount WIM and then click Yes when it prompts you to commit changes.
Finally, after you have completed your changes to the .wim file, you can copy that boot.wim file to your .\sources directory on your USB flash drive. Overwrite the changes and now you have a boot.wim with GImageX in it.
When you boot your computer to the WinPE environment now, you will still get a command prompt. You will need to navigate to .\Program Files (x86)\gimagex and then run gimagex.exe.
Additional Resources
GImageX - https://www.autoitscript.com/site/autoit-tools/gimagex/DISM Commands - https://msdn.microsoft.com/en-us/library/jj980032(v=winembedded.81).aspx


No comments:
Post a Comment