
This post should give you the basics in how to build a Windows 7 image that contains drivers for many different models. Image creation can be fairly straight forward or it can be very involved depending on how much you want to customize it.
What you will need:
- Windows 7 Installation CD / DVD
- WAIK installed on your computer
- A computer to build the image on (if you have VMWare or a HyperV server that would be better)
- A USB flash drive large enough to hold your image and WinPE (8 gig drive is OK if your image is pretty thin, 16 gig drive should do it unless your image is really big)
We will:
- Build a base image
- Build USB Drive to Capture Image
- Capture the base image as a WIM file
- Mount the WIM file so that we can inject additional drivers
- Inject drivers
- Un-mount WIM
When this is complete, you should have a basic Windows 7 image that contains additional third party drivers. What's nice about this is that we will only use free tools (WAIK and ImageX) to create the image.
Step 1: Build Base Image
Install fresh copy of Windows 7 on a computer. At this time, you don't want to install any third party drivers. You may have to install the network drivers if you want to install the latest Windows updates, but other than that, to keep your image clean, install only the drivers you absolutely have to have in order to get the base image where you want it.
Download needed Windows updates, install desired software.
If there are any clients that talk back to a server (i.e. KACE client, SCCM client, etc) then there will be steps you need to take before capturing the image so that those clients have unique identifiers. This will be important if you plan on using your image across several different machines.
Before you capture your machine, you will want to sysprep the machine to generalize it. To do this, you go to the following path:
C:\Windows\System32\sysprep
Inside this folder you will see the following:

Execute the "sysprep.exe" and select the following options. This will generalize your image.

NOTE: This is a very basic way to do this. The WAIK gives you tools to create an unattend file that will allow you to have granular control of how you configure your image. We will cover that in another blog post.
Step 2: Build USB Drive to Capture Image
NOTE: We will be capturing the image with microsoft's ImageX. However, you can use a GUI front end to capture images. The GUI front end to ImageX called GImageX.
Creating a bootable WinPE USB drive with GImageX.
If you haven't already downloaded and installed WAIK, you should do so before continuing.
On the computer with WAIK, go to Start > All Programs > Microsoft Windows AIK > Deployment Tools Command Prompt. Be sure to right click on "Deployment Tools Command Prompt" and select "Run as administrator".
What we are going to do now is create the files and folders necessary for making our WinPE boot drive.
copype x86 c:\winpex86
It should look something like this:
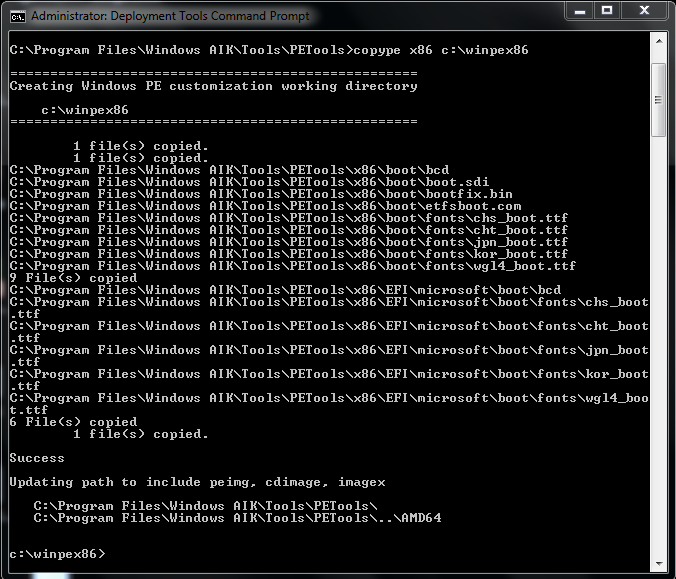
This command copies the WinPE files to the location c:\winpex86. If you need to create a 64bit WinPE boot image, then type the following:
copype amd64 c:\winpex64
From here on out, I will assume that you are using the x86 WinPE.
Now copy the following file:
C:\winpex86\winpe.wim
To the following folder
C:\winpex86\ISO\sources
After you copy the file in that folder, rename "winpe.wim" to "boot.wim".
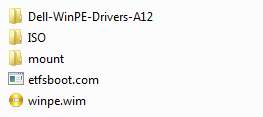
Now look in the C:\winpex86 folder and you should see the following:

Notice the "mount" directory. We will be mounting the boot.wim file (the one you just copied and renamed) in the "mount" folder so that we can add things to the WinPE boot image.
Mount the WIM to insert ImageX into the WinPe boot drive
Run the "Deployment Tools Command Prompt" again as an administrator.
To mount the boot.wim file, type the following command:


NOTE: Before you unmount the WIM, make sure you don't have Windows Explorer opened. If you were viewing the contents of the mount directory and try to unmount it while it's still opened, it could cause problems for unmounting the WIM.
Your mount directory should be empty now. For good measure type the following command in:
Mount the WIM to insert ImageX into the WinPe boot drive
Run the "Deployment Tools Command Prompt" again as an administrator.
To mount the boot.wim file, type the following command:
DISM /Mount-Wim /WimFile:C:\winpex86\ISO\sources\boot.wim /index:1 /MountDir:C:\winpex86\mount

Go to the following folders and copy the highlighted files:
C:\Program Files\Windows AIK\Tools\x86
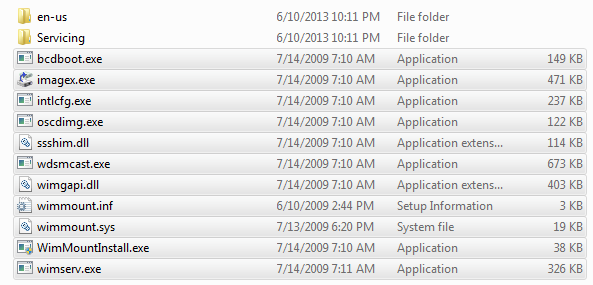
In the mounted WIM file, create the following folder:
C:\winpex86\mount\Program Files\ImageX
Copy the files listed above into the ImageX folder.
Go back to the "Deployment Tools Command Prompt" and type in the following to unmount the WIM:
DISM /Unmount-Wim /MountDir:C:\winpex86\mount /commit
The screen should look something like this:

NOTE: Before you unmount the WIM, make sure you don't have Windows Explorer opened. If you were viewing the contents of the mount directory and try to unmount it while it's still opened, it could cause problems for unmounting the WIM.
Your mount directory should be empty now. For good measure type the following command in:
DISM /Cleanup-WIMThis will cleanup any stale files if there are any.
Prepare your USB drive
Insert your USB drive into your computer.
Go to Start and type "cmd" in the search box. Right click on the "cmd.exe" icon and select "Run as administrator". I don't know if you have to run it as administrator to do it, I just always run it as administrator.
Type "diskpart" and hit enter.
Type "list disk" and hit enter.
Look through the available disks to find one that is the size of your USB drive. In my case, I am using a 2 gig drive so mine shows up as 1937MB.
Type "select disk" and then enter the number of the disk that is your USB drive. (for example: select disk 3 and hit enter)
Type "clean" and hit enter.
Type "create partition primary" and hit enter.
Type "select partition 1" and hit enter.
Type "active" and hit enter.
Type "format fs=fat32 quick" and hit enter. (in my screenshot below, I forgot to add "quick")
Type in "assign" to assign the drive a drive letter.
The whole thing looks like this:

Go to "C:\winpex86\ISO" and copy the contents of that folder onto the root of your USB drive. Don't just right click on the ISO folder and copy it, copy the contents of that folder onto your boot drive.

Step 3: Capture Image File
Go to the computer you want to capture an image file from. Boot to the USB drive you just created.
You should boot into the WinPE environment and all you will see is a command prompt. It should looks like this:

At the command prompt navigate to your x:\Program Files\ImageX and then type the following:
Obviously you will need to capture to a drive that is large enought to hold the image. You can save to a network share if you use the "net use" command to connect to a network share prior to running the imagex command.
You should boot into the WinPE environment and all you will see is a command prompt. It should looks like this:

At the command prompt navigate to your x:\Program Files\ImageX and then type the following:
imagex.exe /capture c: x:\image.wim "image description" /verifyOnce this is done, you will have captured the contents of the c:\ to the x:\ where the name of the image is image.wim. This wim file is what you will need next. That is the file you will inject drivers into.
Obviously you will need to capture to a drive that is large enought to hold the image. You can save to a network share if you use the "net use" command to connect to a network share prior to running the imagex command.
Step 4: Mounting WIM Image File
Here you will need the image file you captured and you will need a folder to mount to. I will mount the WinPE wim we mounted before and inject drivers into it. The process for Windows 7 is the same process however your WIM will contain Windows 7 instead of WindowsPE. I recommend keeping a naming scheme that somehow tracks version changes.
To mount the image, open the "Deployment Tools Command Prompt" again. Use the DISM /mount-wim command again to mount your newly captured wim file. FYI.. you can actually capture multiple image files within a single WIM file which is why we specify /index:1 when we mount the WIM.
To mount the image, open the "Deployment Tools Command Prompt" again. Use the DISM /mount-wim command again to mount your newly captured wim file. FYI.. you can actually capture multiple image files within a single WIM file which is why we specify /index:1 when we mount the WIM.
DISM /Mount-Wim /WimFile:C:\winpex86\ISO\sources\boot.wim /index:1 /MountDir:C:\winpex86\mountIn running this command, I mounted my "boot.wim" file into the C:\winpex86\mount folder. Now that it is mounted, I need to download and inject drivers into this WIM.
Step 5: Injecting Drivers into WIM
Download drivers for whatever models you will be using. I will download the dell driver pack for WinPe and inject those drivers in this example.I will get my drivers from the following location: (Dell makes it easy with their driver packs.)
http://en.community.dell.com/techcenter/enterprise-client/w/wiki/2065.dell-driver-cab-files-for-enterprise-client-os-deployment.aspx
Once the driver files / cab is downloaded, be sure to use something like 7zip to extract the files. I have placed my extracted files in my c:\winpex86 folder.
Dell sorts out the x86 drivers and the 64bit drivers in the subfolder. Be SURE you only inject an x86 wim with x86 drivers ONLY and inject a 64bit wim with 64bit drivers ONLY. So if you are working with more than just a few drivers, it is very helpful to spend the time separating out the x86 and 64bit drivers.
Now let's inject the drivers. For more info on this from Microsoft click here.
Open the "Deployment Tools Command Prompt" and use the following command to import all drivers from a particular folder.
Dism /Image:c:\winpex86\mount /Add-Driver /Driver:C:\winpex86\Dell-WinPE-Drivers-A12\winpe\x86 /RecurseThis command will recursively search through your folder and add drivers that are in that folder. Note that it will tell you if your driver installed successfully.

You can add / remove a single driver at a time if you like. See the Microsoft article link above for more information on that.
Step 6: Unmount WIM file
Unmount WIM file using the following commands:DISM /Unmount-Wim /MountDir:C:\winpex86\mount /commitYou should now have a working WIM file with some third party drivers built into it. You can add or remove drivers using the DISM /Image command.
DISM /Cleanup-WIM
If you created a Windows 7 image, you can now apply that image to a computer using your USB flash drive. You will need to use the apply command instead of the capture command.
For more on the ImageX commands, click here.
Finally, I recommend adding the "GImageX" GUI front end to your USB WinPe environment. It makes it easier to capture and deploy images as you don't have to do everything through the command line.
For a good tutorial on how to get GImageX into your WinPe boot environment click here.
No comments:
Post a Comment